Can a Raspberry Pi Really Work as a Hi-Fi Streamer?
How a $35 single-board computer became the foundation for serious audiophile streaming setups.
Three years ago, I would have laughed at this question. A Raspberry Pi—that little green board they use to teach kids programming—as the heart of a serious audio system? Please. But then I actually tried it. And then I fell down a rabbit hole that I'm still happily lost in.
Wait, Why Would Anyone Do This?
Fair question. You can buy a Bluesound Node for $600 or a Cambridge Audio CXN for over a grand. They're polished products with proper customer support. Why would someone choose to mess around with a tiny computer that requires assembly?
John Darko—whose reviews I've followed for years—wrote a great piece on this back in 2020. His point was simple: dedicated purpose. A Pi running audio software does nothing but stream music. There's no antivirus running in the background, no operating system updates interrupting playback, no fan noise. It's a single-minded machine.
But honestly? The real answer is control. When you build your own streamer, you understand exactly what's happening at every stage. You pick the DAC chip. You choose the power supply. You decide whether to add isolation. Commercial products make those decisions for you, and sometimes their priorities (cost, appearance, features) don't align with yours (sound quality, simplicity, hackability).
The Software Side: Easier Than You'd Think
The Pi itself is just hardware. You need software to turn it into a music streamer, and this is where the community has really delivered.
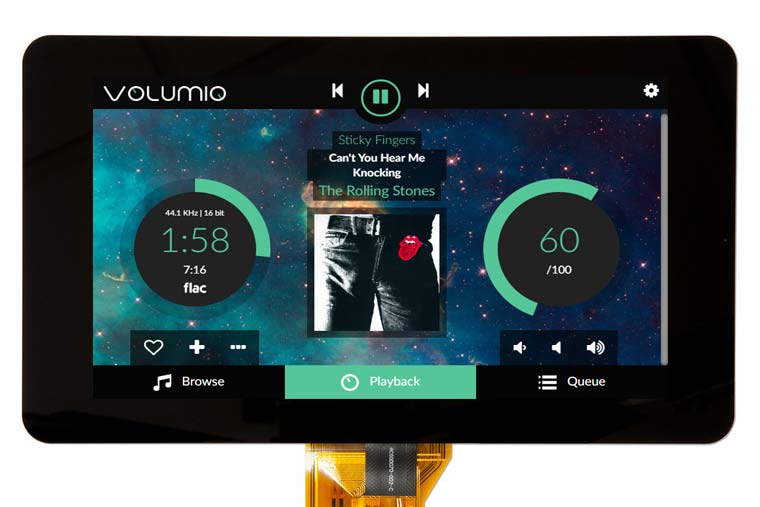
Volumio
This is where most people start, and for good reason. Volumio gives you a beautiful web interface that works from any browser. Point it at your NAS, connect to Tidal or Qobuz, and you're streaming. The free version handles most needs; the paid subscription adds features like Spotify and whole-home audio.
What I like about Volumio is that it just works. Flash the image, boot up, connect to your network. Ten minutes from unboxing to music, if you're quick about it.
moOde Audio
If Volumio is the iPhone of Pi streamers, moOde is the Android. More options, more settings, more ways to tweak. Want to adjust the kernel for real-time priority? Enable hardware volume control on specific DACs? Upsample everything to DSD? moOde lets you get under the hood.
The interface isn't as pretty as Volumio, but the sound quality—particularly with its optimized kernel—is excellent. A lot of serious Pi audio enthusiasts end up here eventually.
RoPieee
If you're a Roon user, stop reading about the others. RoPieee turns your Pi into a dedicated Roon endpoint and does nothing else. Harry ten Berge maintains it, and his laser focus on Roon integration shows. Setup takes about five minutes, and then you've got a Roon Ready endpoint for the cost of a Pi.
The Hardware: Where the Magic (and Compromises) Happen
Let's be real about something: the Raspberry Pi's built-in audio is garbage. The headphone jack uses PWM audio that's noisy and distorted. Nobody uses it for hi-fi. You need an external DAC.

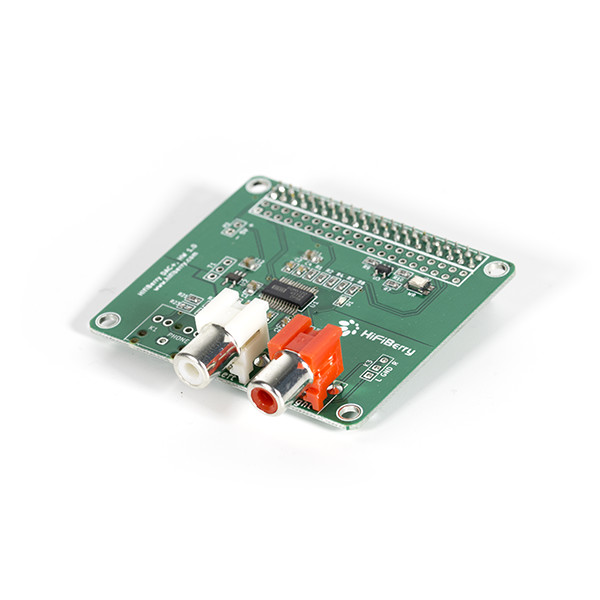
DAC HATs: The Popular Approach
HAT stands for "Hardware Attached on Top"—boards that plug directly into the Pi's 40-pin GPIO header. For audio, these typically use the I2S bus to receive digital audio data, then perform digital-to-analog conversion right on the board.
The options are endless. HiFiBerry has been doing this longer than anyone. Allo makes the well-regarded Boss DAC and Katana. IQaudio (now owned by Raspberry Pi themselves) offers solid mid-range options. Audiophonics, InnoMaker, Sonocotta—there's a HAT for every budget.
Most of these use proven DAC chips like the Texas Instruments PCM5122 or the Burr-Brown PCM1794. They sound good. Really good, actually. The HiFiBerry DAC2 Pro genuinely competes with standalone DACs at its price point.
USB DACs: The Alternative Path
Instead of a HAT, you can just connect an external USB DAC to your Pi. This gives you access to the entire world of USB DACs—from the $100 Schiit Modi to the $6,000 Chord DAVE.
There's a catch, though. The Pi 3's USB and Ethernet shared the same internal bus, causing potential bandwidth conflicts. The Pi 4 fixed this with a dedicated Ethernet controller, making USB audio much more reliable. And the Pi 5? Even better.
Paul McGowan has talked about this in the context of PS Audio's streamers—the quality of the USB implementation matters enormously. A noisy USB connection can add jitter and interference. The Pi isn't bad here, but it's not optimized for audio the way a dedicated streamer is.
The Problems Nobody Mentions in the Forums
Okay, real talk. I've been building Pi streamers for years, and there are limitations that the enthusiast community sometimes glosses over.
Electrical Noise
The Raspberry Pi is a noisy little computer. It's got switching voltage regulators, high-speed digital circuits, WiFi and Bluetooth radios—all generating electromagnetic interference. This noise can couple into your audio chain in subtle ways.
Is it audible? Sometimes. Depends on your DAC's sensitivity, your analog chain, and how carefully you've set things up. But it's there, and addressing it is a whole project unto itself.
No Galvanic Isolation
Standard Pi audio setups have a direct electrical connection between the computer and your DAC. If there's any ground potential difference—and in a typical home audio system, there usually is—you can get ground loop noise.
PS Audio's Paul McGowan has written extensively about galvanic isolation on their blog. It's why high-end streamers and DACs often include isolation between their digital and analog sections. The Pi doesn't have this by default, and adding it requires specialized hardware.
DSD: The Ceiling
This is the one that got me. I spent good money building what I thought was the ultimate Pi streaming setup—only to discover it couldn't play DSD512 natively.
Most DAC HATs communicate via I2S at rates that max out at DSD128 using DoP (DSD over PCM). Some stretch to DSD256 with native DSD support. But DSD512 at 22.5792 MHz? The standard I2S implementation on most HATs simply can't handle it.
If you're not into DSD, this doesn't matter. If you are—if you've bought albums from NativeDSD or Blue Coast Records in DSD512—it matters a lot. You've got these beautiful high-res files, and your Pi setup is quietly downsampling them or converting them to PCM. Not what you paid for.
So Is It Worth It?
Here's my honest assessment after years of tinkering:
For a bedroom or office system? Absolutely. A Pi with a good DAC HAT, running Volumio, is an incredible value. You'll get sound quality that embarrasses most Bluetooth speakers and many all-in-one streaming systems.
For a main hi-fi system? It can work, but you need to address the limitations. Better power supply. Galvanic isolation between the Pi and your DAC. Careful attention to the digital-to-analog path. At some point, you're spending as much on add-ons as you would on a commercial streamer.
For high-resolution DSD playback? Standard Pi setups hit a wall. DSD64 and DSD128 work fine via DoP. Beyond that, you need hardware specifically designed for native DSD—something that treats the Pi as a source for USB or I2S data, then handles the DSD conversion in purpose-built circuitry.
The Dream Setup
What I really wanted—what I spent way too long looking for—was a way to use the Pi as the brains of the operation while offloading the audio-critical stuff to dedicated hardware. The Pi handles the network streaming, the user interface, the library management. But the digital audio path goes through something designed specifically for that job.
That means native DSD support up to the highest rates. Galvanic isolation to break ground loops. Clean power regulation. A signal path that treats audio seriously rather than as an afterthought.
The pieces exist—isolators, external DAC interfaces, reclockers—but cobbling them together is expensive and fiddly. What I wanted was an integrated solution that just worked.
Which, eventually, is why I ended up here.
The DSD Bridge gives your Raspberry Pi native DSD512 capability with galvanic isolation—no compromises.
Explore the DSD Bridge
Comments
Be the first to comment on this article.